
Build Status and Deploy Button with a Raspberry Pi, Octopus and CruiseControl.net
I made a build status and deploy button using a Raspberry Pi that connects to our Octopus deploy server and our CruiseControl.net build server.
Why? Well it all started a while ago I got a Raspberry Pi mini computer to muck around with at home. I was pretty blown away with it for a number of reasons
- Cheap - enough said.
- Power consumption - they don’t use much, you can even run one on a backup phone battery.
- You can swap SD cards to swap the OS - It’s like the olden days when your machine used to boot from floppy (but you only need one thank goodness).
- They are small - well smallish.
- They have GPIO pins (General Purpose Input Output pins).
They had me at cheap! It wasn’t until it arrived that I realised how cool being able to mess with programmable pins was. This started my journey, at first I was reading articles on the web and eventually I bought this book Teach Yourself Electricity and Electronics, 5th Edition to get a more comprehensive understanding about electronics.
A few months later and we are using Raspberry Pi’s at work for fun and profit. Having a device on my desk at work for testing gave me the idea for a project that was suitably simple. I wanted to make something to learn about electronics and practise some soldering. The idea was to make some status LEDs indicate the health of the build at work and have a button for deploying our software. I managed to get it working, this is what it looks like, some people have said that it bears some resemblance to a Nyan Cat.
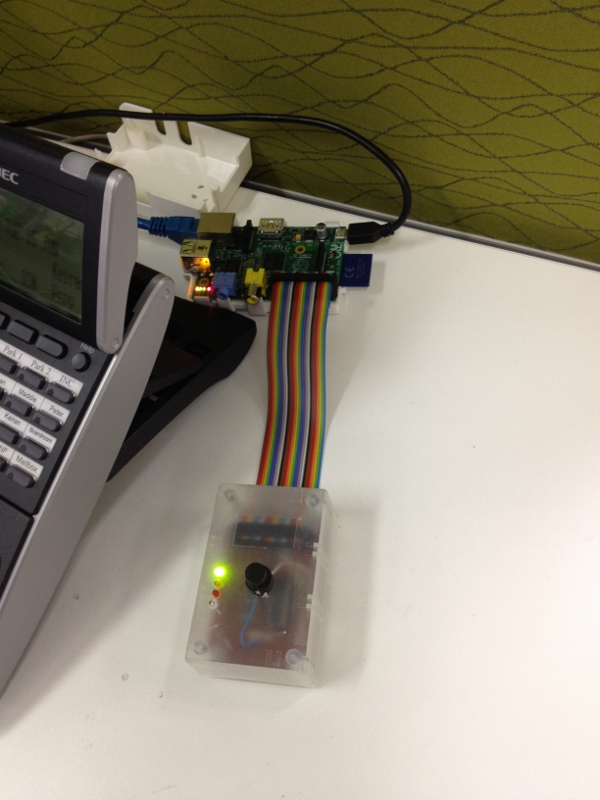
Raspberry Pi Deploy Button
A few people have been asking about how it went. I made a video so you can see for your self.
Software
I wrote the software that runs the button and the LEDs in Javascript using node.js. I used node because it has heaps of packages that communicate via http and with the GPIO pins. Getting the software up and running was rather quick.
I found it amusing to operate electronics using a high level language. To read and write from the GPIO pins I tried a number of packages and ended up using onoff because it supports reading via an interrupt rather than polling, which thrashes the CPU.
We are using CruiseControl.net for our build server and Octopus Deploy for our deploy server. I used request.js for getting the build and deploy status via http.
To start a deploy, Octopus has a command line tool written in .net that lets you remote control the server. I thought this would be the most stable interface to code against, so I tweaked the code to get it to run in mono, but I discovered there is an issue in mono that I am still waiting on a fix for. It should be possible to use request.js for creating and deploying a release, but I can wait a little longer.
Hardware
I thought software was hard, then I started learning about electronics. It’s amazing computers work at all.
For the LEDs, I am using an Integrated Circuit with a Darlington Array of transistors on it, this allows a higher voltage to power the LEDs and protects the CPU which is connected to the pins. Each LED requires a different resistor according to its specifications. I found this handy site that talks about GPIO pin interfacing.
You would think the button would be pretty easy, it is either on or off right? it’s a bool! Well not quite, the button needs to be grounded so that it can be read correctly. Also you want to know what the value is when it changes without using your CPU to poll all the time. So you need an interrupt which signals your program when the pin changes state. To top it all off, when you go to read the value, it might not be correct as electricity bounces. To counter bounce you can write some code to trade off responsiveness with accuracy or use a low pass filter (a circuit).
Result
I really enjoyed making this, it started off as a simple idea to practice soldering, but turned into something that is rather useful. I think for our team, it sets the bar for how easy the deployment of our software should be. It is a physical symbol that the deploy is one step, and any features that get deployed, need to a part of that step. If anyone makes it more complicated than that, then they are going to have to get the soldering iron out.